 So I started out in the world of multirotors how I feel most folks would, with a 350 size quadcopter. I chose the DJI Phantom. The Phantom was ideal to start with as it was RTF. I didn’t have to assemble anything and it was very easy to setup out of the box. Right away I could tell the Phantom isn’t a toy, but a great way to get into flying multirotors.
I enjoyed flying the Phantom but I wanted something bigger with more options. I wanted something I could build to understand how these things work better and to hopefully keep the price down some. I decided to go with the DJI F550 kit that included the NAZA M V2.
The kit doesn’t come with a transmitter or receiver. After looking around at my options I decided to use a brand known more in Europe, Graupner. The Graupner transmitter has been reliable and has a lot of nice features.
Unboxing the DJI F550:
When I received the kit and all of the misc. components I was surprised at how small of a box they packed it all in. I couldn’t believe a DJI F550 fit in this tiny little box but to my surprise everything was there. There weren’t any instructions included with any of the DJI products I purchased. I found out you have to rely on the website to download the instructions. I prefer a paper form of instructions to add notes so I printed mine off. Everything was neatly packaged and labeled well.
The Graupner MX-20 transmitter came with a nice large book to help with installation and understanding how their system works better. It was packaged nicely in foam and everything worked out of the box.
Assembling the DJI F550:
Now it’s time to assemble this contraption. After separating all of the pieces into my organized mess I thought it would be smart to first solder the ESCs (electronic speed controller’s) to the DJI F550 board bef ore I add the arms as they may get in the way. I felt slightly intimidated soldering as I didn’t want to cook the board as I am still learning the art of soldering. Laying the ESCs out I noticed they don’t leave you near enough wire to easily reach the correct solder points. Fixing this issue wasn’t hard to do, but it was a pain as the negative lead wraps around the positive wire. After making the negative leads slightly longer I was able to successfully solder all wires with good solder joints.
Next came attaching the arms to my DJI F550. I used a small amount of blue lock tight to prevent the screws from working loose during flight. Attaching the arms was probably the easiest step. Be sure to place the red colored arms at the front of the board so you can determine the front from the back when you are flying. I then attached the motors to the arms. They are all labeled clockwise and counter clockwise to make it easy for install. It isn’t the motors direction they turn but the thread on the shaft for the prop that is counter CW or standard CW. Make sure when installing the arms you place the motors on the correct arms so they match the picture in the NAZA software. If you don’t, it will affect the way the multirotor flies. Now I plugged the motors into the ESCs. The 3 CCW motors need the center wire and the left wire on the motor swapped when plugging into the ESC. So the center wire is plugged into the far left slot on the ESC and the far left wire is plugged into the center slot on the ESC. I then used zip ties to secure all of the wire on the arms to keep everything clean and tidy.
With all of the basic assembly finished the hard part was up next, wiring the NAZA with the receiver. This had to be the most difficult part of the build. Figuring out how to wire and program the transmitter to the NAZA was similar to wiring a car but had far more wires.
But before you can wire the mess together you need to secure the NAZA M V2 controller to the board as well as your receiver and PMU. When securing the NAZA controller to the board you want to make sure it is centered and the arrow is pointing towards the front of the board. After that you can select where you want to place you receiver and PMU with the space you have left. Keep in mind where you place them as the wires need to reach certain areas.
After getting things situated where I wanted them I attempted to wire the mess together based off the instructions with the NAZA software and manual from the Graupner TX. This didn’t work out as easy as I thought it would; I ran into many walls that were near impossible to climb over. First the TX wouldn’t communicate with the NAZA. I started to google around for answers and was lead to download new firmware for the TX. That was fun in itself as the video was in German with poor English subtitles, haha. I was able to get the new firmware but it did not resolve the issue of communication from the TX to the NAZA M V2. I then went through rewiring the system several times while attempting to find some sort of help via forums. I searched and searched but couldn’t find information on the normal RC forums I frequent. At this point I considered doing an angry dance on the thing (stomp on it), shoot it with my shotgun or let my dogs eat it. It was like the NAZA M V2 and Graupner hated eachother and didn’t want to get along. I thought I was out of luck and would have to return this useless transmitter and start this mess all over again with a different brand of TX. The next day I figured I might as well try and google search this mess again. Through the depths of the internet I found a thread on a German multirotor forum. Hallelujah, I am saved! It had an in depth explanation of how to use the Graupner transmitter with the NAZA systems. This thread turned the tide and put me on the winning side of this battle. I did have to use Google Translate to communicate but the folks on  the forum were awesome and helped me figure out my issues.
The time has come to see if what we have done was going to work and get this DJI F550 in the air. It was like magic the first time my transmitter finally communicated to my Naza and the motors spun up. I had to pinch myself to make sure I wasn’t dreaming. Sweet success, I am now ready to take this thing out and see if it will fly. (I will be writing up a separate blog with the instructions of how to use the Graupner transmitter with the NAZA.)
What battery to use on the DJI F550:
Well with the complete package being assembled and ready to fly I now have to decide on what battery to use in my DJI F550. Most of our customers here at MaxAmps have used the 11000mah 4s or 9000mah 4s with great success. I decided to go with the 9000mah 4s as it is has a higher C rating and with my heavy landing gear I wanted to make sure the pack would work well. I’ve heard great things about both packs but I wanted the higher C rating in case I want to lift a heavier payload in the future with some upgrades to the DJI F550 of course.
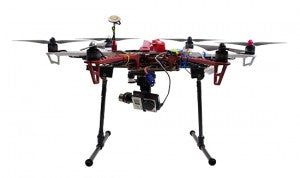
Time to fly the DJI F550:
Finally, I was ready to fly. I have everything plugged in, NAZA indicator LED is flashing green showing it has registered home and is talking with the satellites above. With my nephew alongside waiting for this thing to take flight I started up the motors and was off the ground. On initial take off my DJI F550 was spinning in a slow circle, which didn’t make sense but I was flying so I f elt some success and relief after how long it took me to get the thing together. Now to show my nephew how the cool retractable landing gear raises. I flip the switch to raise the gear but the landing gear stayed down. I thought, “Well that sucks!”, but wait the LED is flashing yellow and my multirotor is not responding to my commands on the TX. I figured this thing was gone and I was going to have to disperse lost F550 flyers. Well my DJI F550 didn’t fly away but flew towards the side of the hill and face planted. My brand new DJI F550 on the first flight, crashed. We ran over to see the damage and found only a broken prop which was a relief. The relief only lasted for a few seconds as now I am back at square one again trying to figure out why this thing isn’t flying as it should.
I got home and immediately plugged the DJI F550 into the Naza to see if my settings had changed somehow. Everything seemed correct except all modes of GPS were reading in failsafe mode. Well the way I was instructed to setup my TX is to have a switch to turn on fail safe and a switch to select the failsafe mode. The switch I thought I was flipping to raise the landing gear was to send the NAZA to Failsafe course lock. I flipped that switch back and the GPS went back to normal on the NAZA. I now understand why this happened and have since memorized my switches to prevent that from happening again.
I also had to find out why my DJI F550 was spinning during the first flight. I found out through some digging in the forums that it was due to the GPS being mounted backwards and the arrow pointing opposite from the controller. I go to check my DJI F550 and sure enough the GPS arrow is pointing towards the rear of the DJI F550 and the controller arrow is pointing towards the front like it should. I resolved that issue right away to prevent that from happening again. Funny thing is this is all in the instructions from DJI. I guess I was too excited when assembling and went to fast.
Take two, the second flight:
The second flight was a success! I was able to run through all of my batteries and the DJI F550 flew great. I was also able to use my FPV for the first time which was a thrill in itself. I did however notice extremely low flight times from my 9000mah 4s packs which did not make sense as customers reported much longer flights. I saw around 6-7 minutes of flight which made no sense. After looking into the problem I was able to deduce that the stock low voltage cutoff is set very high to protect against power loss mid-flight. I have since adjusted the stock cut off value to a lower point and I am now seeing 12-15 minutes of flight depending on how I am flying and weather conditions. We do not recommend changing cutoffs in most cases as they are there for a reason. If you are a seasoned pilot you can begin to rely on the time of a flight rather than the cutoff voltage. This will give you longer time in the sky.
All in all it was a great experience building my own DJI F550. There were plenty of times when I wanted to throw it in the street and watch it get smashed by the city bus but I kept on with the build with the support from the crew here at MaxAmps. I guess with all things new there will be some hiccups. I now feel more comfortable with multirotors in general from building my own. I recommend that when you are ready to take on a project like this that you use the resources around you. The RC community is a very informational bunch. I had no idea on how to do it but there were plenty of resources out there to help me. Now we are here to help you along your way.
Just remember to be safe when flying your DJI F550 or any other multirotor.


–Dan Gall/Sales Manager- MaxAmps.com
